Are you looking for a way to integrate your Shelly device with HomeKit but feeling unsure about the process? You’re not alone. Many Shelly users face challenges when it comes to flashing their devices and updating them with HomeKit firmware. Fortunately, this article simplifies the process for you.
If you want to skip the complicated process of flashing firmware, you can use a third-party bridge instead. This option lets you add your Shelly device to the Home app easily so that you can control and automate it directly from your iPhone or iPad. In this guide, I’ll walk you through both methods step-by-step so you can easily add your Shelly device to HomeKit.
Integrating Shelly Devices with HomeKit Using HomeKit Firmware
To integrate Shelly devices with HomeKit, you need to flash them with the HomeKit firmware. This method works when adding any Shelly device to your Apple Home system.
Steps to Flash Shelly Device
1. Connect Shelly to power: Connect the Shelly device to the power supply and power it on.
2. Connect to Shelly’s WiFi: Once powered, the Shelly relay will show up as a WiFi network. Connect your iPhone or iPad to it, and your IP address will adjust accordingly.
3. Find the Device’s IP Address: Locate the IP address of your Shelly device and enter it in a web browser.
4. Reconnect to Your WiFi: When the Shelly web interface opens, reconnect your device to your own WiFi.
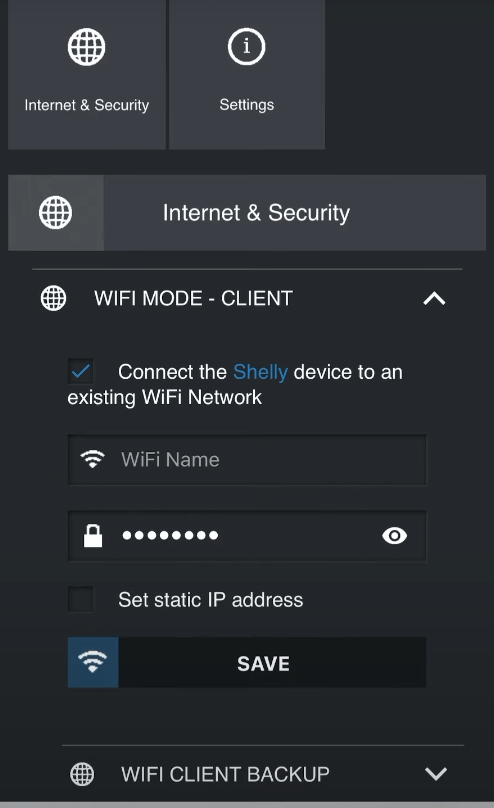
5. Set WiFi Client Mode: In the Settings, choose WiFi Mode – Client, then enter your WiFi network name and password.

6. Get the New IP Address: Obtain the new IP address of your Shelly device via your router, and open it in your web browser.
7. Update Firmware: In your browser, use the following URL to update the firmware.
http://<enter IP address>/ota?url=http://rojer.me/files/shelly/shelly-homekit-Shelly<type>.zip
Replace <enter IP address> with the new IP address and <type> with your Shelly device version
8. Flash the Shelly Device: This will flash your Shelly device, updating it for Apple HomeKit compatibility.
9. Device Appears on Web Interface: Your Shelly device will appear as either a bridge or a switch based on its model.
10. Name Your Device: Navigate to General Settings and assign a name to your Shelly device.
11. Configure Device Mode: Set the device’s mode under the Mode section, configure the Input Mode to Toggle, and click Save.
12. Set a Web Server Password: For security, create a password for the web server of your Shelly device.
13. Restart and Reconnect: Restart your Shelly switch, reconnect it to the browser, and enter the password if prompted.
14. Get HomeKit Setup Code: Go to the HomeKit settings and retrieve the HomeKit setup code for future use.
Steps to Add Shelly to HomeKit
To add Shelly to HomeKit, follow these simple steps using the Home app on your iPhone or iPad.
1. Open the Home App: Launch the Home app and select the + icon on the top right corner.
2. Select Add Accessory: Choose Add Accessory and then click on More Options.
3. Enter Setup Code: Tap My Accessory isn’t Shown Here, then choose Enter Setup Code and input the HomeKit setup code for your Shelly switch or bridge.
4. Handle Uncertified Accessory Warning: If an Uncertified Accessory warning appears, press Add Anyway to continue.
5. Configure Device: Assign a location and name for the Shelly device, then click Continue.
6. Finalize Setup: Press Done to complete the integration of your Shelly device with HomeKit.
How to Connect Shelly Devices to Apple HomeKit Using HOOBS
If you encounter issues while flashing your Shelly devices for HomeKit integration, you can use a bridge instead. HOOBS is a top-notch third-party bridge that works seamlessly with most HomeKit devices.
Setting Up HOOBS
1. Power Up your HOOBS Device: Plug the HOOBS device into a power outlet and switch it on. The LED light will initially show red.
2. Connect to Network: Use an Ethernet cable to connect HOOBS to your WiFi network. The LED light will turn green when the connection is established.
3. Download HOOBS Client: Open your web browser and visit the HOOBS official website to download the HOOBS Client App.
4. Pair your HOOBS Device: Install the app and pair your HOOBS device using either the Network Scanner or by entering the IP address.
5. Complete Setup: Once your device is detected and added, follow the prompts under the Setup a New Device tab and click Finish.
Install and Configure the Shelly Plugin
1. Access HOOBS Plugin Page: Visit the HOOBS website and click on the Plugin option.
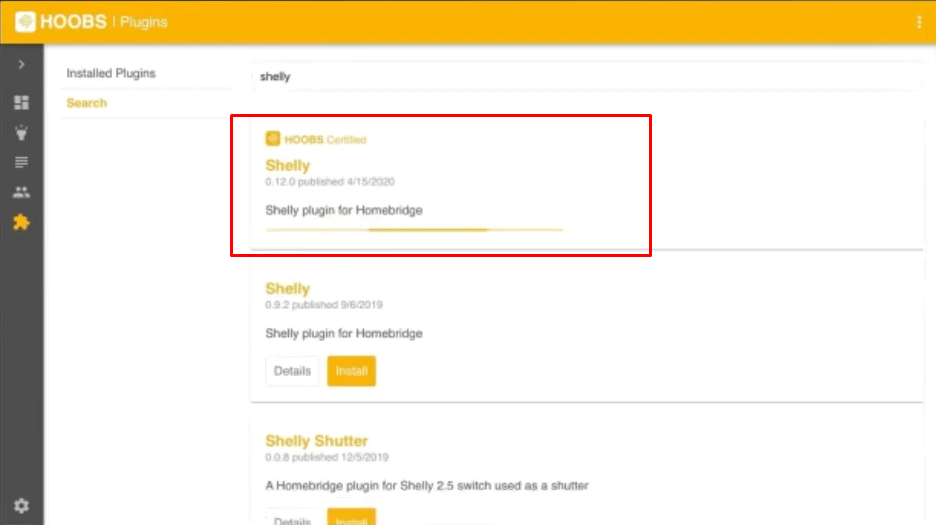
2. Search for Shelly Plugin: Type Shelly in the search bar and select either the Shelly plugin or the Shelly Ng plugin from the search results.

3. Install the Plugin: Click the Install button. After installation, proceed with the configuration setup.
4. Follow Configuration Instructions: Configuration steps may vary depending on your Shelly device. Follow the specific guide provided for the plugin carefully.
5. Restart HOOBS: Restart your HOOBS device to complete the setup. This will add all your Shelly devices to HOOBS.
6. Generate HomeKit QR Code: A unique HomeKit QR code for your Shelly devices will appear on the HOOBS Shelly plugin page.
Adding Shelly to the Home App
1. Open Home App: Launch the Home app on your iPhone and tap the + icon.
2. Add Accessory: Select Add Accessory to access the scanning page.
3. Scan QR Code: Scan the HomeKit QR code generated by the HOOBS plugin.
4. Assign Location: On the next screen, select your device and assign it to a location or room within the Home app.
5. Name your Device: Press Continue and name the device if you want to change its existing name.
6. Complete Setup: Click Continue and then Done to finish the setup.
By following these steps, you can add Shelly devices to your Apple HomeKit using the HOOBS bridge. This method is straightforward and user-friendly compared to other methods.
Shelly Devices Compatible with HomeKit via HOOBS Plugin
You can integrate the following first-generation Shelly devices with HomeKit using the Shelly plugin via the HOOBS bridge.
| Shelly Sense | Shelly Door/Window |
| Shelly RGBW2 | Shelly Dimmer |
| Shelly Plug S | Shelly Bulb (requires software version 1.2.1 or above) |
| Shelly plug | Shelly 4Pro |
| Shelly H&T | Shelly 2.5 (requires version 1.4.9 or later) |
| Shelly HD | Shelly 2 (requires version 1.4.9 or later) |
| Shelly Flood | Shelly 1 PM |
| Shelly EM | Shelly 1 |
If you have installed the Shelly NG plugin, you can now integrate the following latest generation of Shelly devices into your Apple HomeKit.
| Shelly Pro 4PM | Shelly Pro 1 |
| Shelly Pro 2PM | Shelly Plus 1PM |
| Shelly Pro 2 | Shelly Plus 1 |
| Shelly Pro 1PM | Shelly Plus 2PM Plus |
FAQ
Yes, there are Shelly devices compatible with Matter that can be integrated with HomeKit. These include the Shelly H&T Gen3, which is a Matter-compatible Wi-Fi temperature and humidity sensor, and the Shelly Plus and Pro Series devices, which also support Matter.
Yes, you can find the HomeKit firmware for Shelly on GitHub, which is available to update your Shelly devices.
