Adding Kasa with Apple Homekit allows you to control your Kasa smart plugs, lights, and cameras alongside other HomeKit-enabled devices hands-free. Fortunately, most Kasa devices are compatible with HomeKit and can be controlled using the Home app or voice commands. You can add the Kasa device directly to the Home app or through the Kasa Smart app.
If the Kasa device is incompatible with the HomeKit, you can use bridges like HOOBS for integration. This article will guide you in adding the Kasa devices to HomeKit.
How to Integrate Compatible Kasa Devices with HomeKit
You can add the Kasa devices to the HomeKit using any of the ways discussed below.
Home App
Since the Kasa devices are compatible with the Apple HomeKit, you can directly add the device using the Home app.
1. Home App: Launch the Home app and hit the + icon.
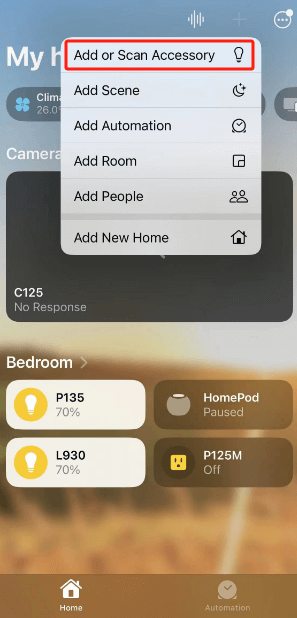
2. Scan Code: Choose the Add Accessory/Scan Accessory and scan the QR on the Kasa device.
3. Device Integration: Thus, the app will begin integrating with the device.
4. Assign Rooms: Once the process is over, you need to assign rooms and names to the Kasa device.
5. Modify Scenes: Following it, modify the scenes and finally tap the Done button. Thus, you can now control the Kasa device using the Home app.
Kasa Smart App
As a basic requirement, your iPhone must have the Kasa Smart app. If not, get the app from the App Store. Once done, launch it and complete the login procedures.
1. Plus Icon: Get the home screen and hit the + icon.
2. Device Selection: Select your Kasa device and its model number.
3. Instructions: As a result, a set of instructions will appear. Follow the guide.
4. Status Confirmation: After following the instructions, click on Already Orange and Blue.
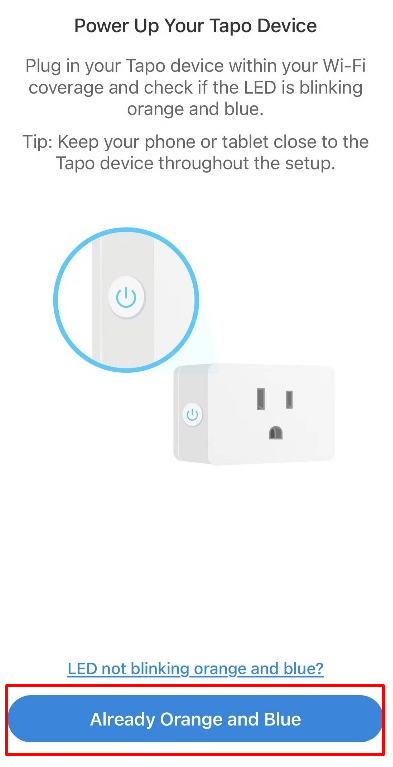
5. WiFi Selection: Once the Kasa device appears on the application, you will be prompted to choose a WiFi network. Follow the prompts and connect the device to the WiFi.
6. Devices Added: Thus, the Kasa device will be added to the Kasa app.
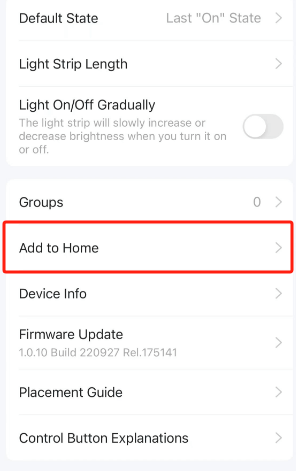
7. Open App: After that, open the Device Settings on the Kasa app and click the Add to Home option. Now, the Kasa device will be added to the HomeKit.
Steps to Add Kasa KP125/EP25 V1
First, reset the Kasa KP125/EP25 V1 device to factory defaults and follow the steps below.
1. Power On: After turning on the Kasa device, long-press the Power button on the device panel. Release it when the device’s LED light blinks orange and blue.
2. Plus Icon: Launch the Kasa Smart app on your iPhone and press the + icon.
3. Select Device: Click the Device option and select the device from the list.
4. Blink Confirmation: The app will ask whether Orange and Blue blinks on the Kasa device.
5. Help Option: However, click the I Need Help option. This helps to add the device to HomeKit within the app.
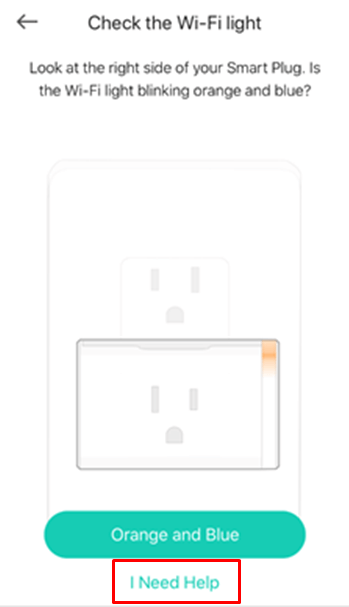
6. Setup Option: Choose the Set Up with Kasa option.
7. Power Button: Following it, pick your Kasa device and click its Power button thrice. As a result, the device’s light will flash Orange thrice.
8. Blink Selection: If it blinks orange thrice, choose the Already orange option. If it blinks Orange and Blue, select It is blinking orange and blue option.
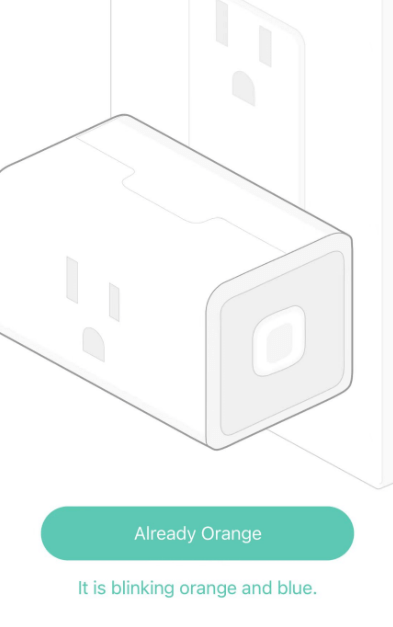
Thus, the Kasa KP125/EP25 V1 is now added to the Kasa app.
9. Add to Home: Open the Device Settings on the Kasa app and click the Add to Home option.
That’s it; You have added the KP125/EP25 V1 to HomeKit successfully.
Steps to Add Tapo L930 V1 with Apple HomeKit
As a basic requirement, get the Tapo app from the App Store on your iPhone and set up the app.
1. Open the Tapo App: Launch the Tapo app and hit the + icon.
2. Select Device: Then, choose the type of device and its model number.
3. Check Light Status: Once you confirm the light’s status (flashing orange and green), the app will guide you through adding the light strip to HomeKit. If you want to skip this step, select I Need Help, then tap Set Up Manually.
4. Exit HomeKit Mode: Long-press the controller button for 5 seconds. Release it when the lights flash blue and purple.
5. Instructions: Follow the Tapo app’s instructions to connect your phone to the strip’s Wi-Fi, then link it to your home Wi-Fi and complete the setup.
6. Add to Home: Once done, open the Device Settings on the app and click Add to Home. Thus, adding the Tapo L930 V1 to HomeKit is successful.
How to Add Incompatible Kasa Devices to HomeKit
If you want to integrate Kasa devices that aren’t compatible with HomeKit, HOOBS (Homebridge Out of the Box) is a reliable solution. This method enables you to easily add a device like Tplink Kasa to HomeKit.
1. Download the HOOBS app: Go to the official HOOBS website and download the desktop app.
2. Login: Open the app and log in to your HOOBS account.
3. Access Plugins: On your dashboard, navigate to the Plugins tab and search for the Tplink Smarthome plugin.
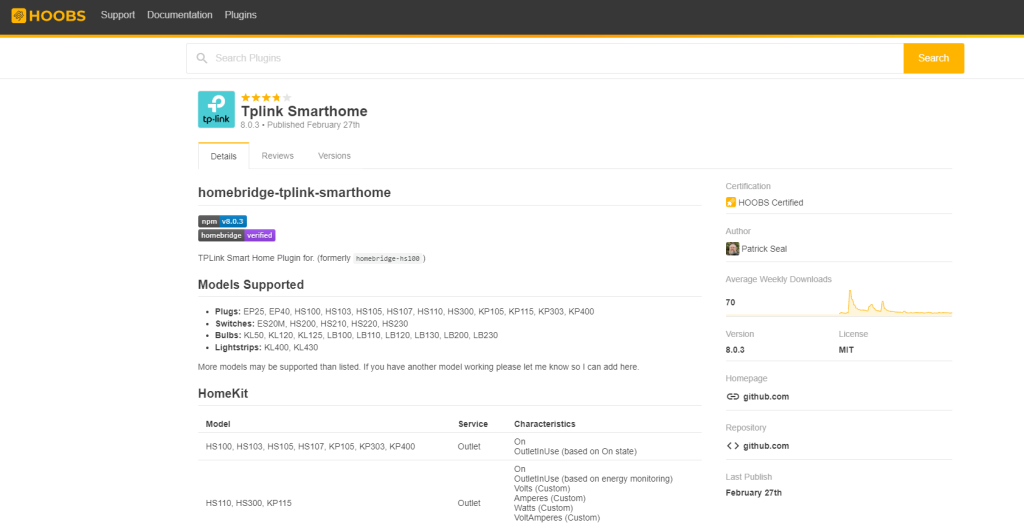
4. Install Tplink Smarthome Plugin: Click Install, and the plugin will begin to download.
5. Configure the Plugin: After installation, click Configure and add the below code to the configuration interface.
“platforms”: [{
“platform”: “TplinkSmarthome”,
“name”: “TplinkSmarthome”
}]
6. Open Home App: Launch the Home app on your iOS device. Your Kasa devices should now be visible and ready to control.
7. Add Accessory: Click the + icon and choose Add Accessory. Then, follow the necessary instructions shown on the app to add the device.
Once added, you can seamlessly add and control non-compatible Kasa devices through the Home app.
Benefits of Adding Kasa Devices to Apple Homekit
Adding Kasa devices to HomeKit offers several benefits, which are given below.
- Unified Control: You can manage all your Kasa devices alongside other HomeKit-compatible smart home products from one app.
- Siri Integration: You can use Siri voice commands to control your Kasa devices, making it easier to adjust settings hands-free, such as turning lights on/off or adjusting brightness.
- Automation and Scenes: Create automated routines and scenes that include your Kasa devices, allowing for customized settings based on time, location, or actions of other devices.
FAQ
Yes. You can add the Kasa switch to HomeKit using the Kasa Smart app.
Not all Kasa devices require a bridge. You will need a bridge like HOOBS to add incompatible devices.
